Wednesday, October 24, 2007

Painting Technique - Painting the Negative Space


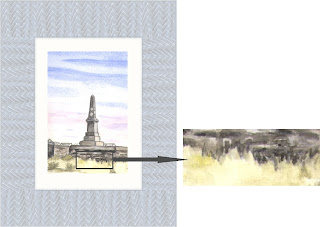
When using acrylic paint you can add layers of light colour to increase the definition of a pale area. However another option is to paint in the negative area to highlight the pale area.

This is a very good technique and can make your paintings more interesting. It is also an easy way to add detail to a flat area of colour.

The example is just a small section of a painting but it shows how this simple technique can quickly add interest with the minimum effort!

In this example

Always try to contrast light and dark areas in a picture. When you have this kind of contrast it is easy to paint in some of the negative areas because one of the adjoining sections will be in a darker colour.

(I think that it is more successful to paint in negative areas with a darker colour, but if you want to try to use a lighter colour over a darker one be sure to use the paint more thickly.)

In this case the dark colour is used to make the top of the pale area jagged; this makes the pale area look more grass like.

In the example the darker colour was used to paint in the negative area behind the grasses and then faded into the background area. The unevenness of the stone wall made this easy, but if the negative area was smooth you can just blend the colour using water to thin it. By leaving a darker edge next to the pale colour you get a nice contrast too.

Use this technique

To add definition to any areas you feel needs it. It would be good for darkening the area to the side of a tree trunk and make the trunk stand out a bit more. Ideal for the trunk of a silver birch, just add some extra dark shades to the area at the side of the trunk to give the trunk more contrast and this helps to make the trunk more three dimensional too.

It is great for forest paintings as you can hint at more trees in the background without giving them too much detail.

Top Tip – the greatest contrast areas are always in the foreground of a picture. Make sure you have the contrast between the colours suitable for the distance in the painting, i.e. not too much contrast for areas in the distance.
Visit the Learn and Do website at http://www.learnanddo.com/ to find out more about The Acrylic Painting Course. Check out the free preview of the course too.

Tuesday, October 02, 2007

Titanium White and the Meanings Given to the Colour White

This post is a look at Titanium White and the meanings given to the colour white.

It is interesting to see that we have probably all eaten this colour’s usual pigment!

Titanium White

At Wikipedia it says – “The main modern white hiding pigment is Titanium dioxide. (A naturally occurring oxide of titanium)

Some pigments are toxic, such as the lead pigments that are used in lead paint. Paint manufacturers began replacing white lead pigments with the less toxic substitute, titanium white (titanium dioxide), even before lead was functionally banned in paint for residential use.

Titanium dioxide, also known as titanium(IV) oxide or titania, is the naturally occurringoxide of titanium, chemical formula TiO2. When used as a pigment, it is called titanium white, Pigment White 6, or CI 77891.

It is noteworthy for its wide range of applications, from paint to sunscreen to food colouring. It is employed as a pigment to provide whiteness and opacity to products such as paints, coatings, plastics, papers, inks, foods, medicines (i.e. pills and tablets) as well as most toothpastes.

Used as a white food colouring, it has E number E171. In cosmetic and skin care products, titanium dioxide is used both as a pigment and a thickener. It is also used as a tattoo pigment and styptic pencils

This pigment is used extensively in plastics and other applications for its UV resistant properties where it acts as a UV reflector.”

White paints can also be made from other white pigments such as chalk (not in oil) and zinc white, as well as titanium white.

This explains why white acrylic paint is opaque and not suitable for a lot of the watercolour techniques, as discussed in The Acrylic Painting Course. And how it can be used to over-paint any areas that do not turn out!!

Do you want to learn to paint? Find out more about The Acrylic Painting Course at

http://www.LearnAndDo.com/acrylic.asp

Some Meanings for White -

The white flag is the universal symbol for truce.

The ancient Greeks wore white to sleep in so that they would have pleasant dreams. The ancient Persians believed that all gods wore white.

A white sale is a sale of sheets, towels and other bed and bath items.

In the 20th century western brides have worn white to symbolise innocence and purity.

In China white is the colour of mourning.

It is worn by doctors and nurses to show that cleanliness is important and to ensure that their garments are clean and dirt-free.

A white knight is a rescuer.

To whitewash over something is to make it seem presentable when it is not!

White reflects light and is considered to be a summer colour. It is popular in fashion and decorating as it is light and neutral.

Tuesday, August 21, 2007

Making Your Own Custom Artwork using Aperture Frames


Original painting and the final framed picture


Some of the options that could be used from the original painting.


Making artwork to match your décor is an interesting and easy project. This article looks at different options when using aperture frames. Aperture frames are widely available from home furnishing shops and other household stores.

An aperture frame comes complete with a mount (mat) cut to display photos. The size of the aperture can vary but usually they are photograph size, often 6 by 4 inches. The frames can be suitable for a single photo or for a number of photos to be displayed in the one frame.

These frames are a handy way to make your own artwork to display in your home. There are a number of options when using these frames, not including the intended method of using photos!

Landscape Option

For this idea you paint one piece of paper that will fill the whole of the frame. This works particularly well with frames that have more than one aperture. Once your painting is placed behind the mount it will give the effect of a range of matching landscapes.

You don’t need to get too worried about the actual landscape because the final piece will only show a few sections of the painting. I like to use a horizontal looking landscape with the sky, distant hills, closer areas painted in very simply.

Once the paint is dry you can place the mount on top to check the result. You can always add more detail if you want.

Top Tip – Make your painting larger than the final picture. This will allow you to move the pre-cut mount around your painting to give you a range of options to choose from.

Abstract Version

Using the same technique you could use just horizontal stripes instead of a landscape. If you include similar colours to ones used to decorate your room you will have a quick and easy method for creating matching artwork.

Paper Version

If you don’t want to paint anything yourself you could use a piece of gift wrap instead. Find a wrapping paper you like and use it, in the same way, in the aperture frame instead.

You could always try a piece of wallpaper from the room.

Fabric Option

It doesn’t have to be paper! Try using a thin fabric behind the mount for a different effect. Perhaps you could try some of the upholstery fabric from your room if it is not too thick.

Another option is buying an off-cut of a fabric you like or that has the colours you want to include in your picture.

The Final Finish

These ready made frames provide a range of possibilities for making your own unique artwork. The frames come in a good range of colours and woods too. Select the frame that will match the style of your room for a pleasing result.

The best part is that once you put the frame back together it is beautifully presented too. Amaze your friends with this easy way to make an original display. This would make a great gift too.


Friday, June 22, 2007

Using Texture Paste - an Acrylic Painting Technique


Use texture paste to add extra interest to your pictures.


Impasto Pictures

For impasto pictures it can be very cost effective to use texture paste rather than huge amounts of acrylic paint.

Texture paste is a white product. While you can add colour to the texture paste to colour it, a better way is to apply the white paste to the picture, let it dry and then add the colour over the dried paste. This technique uses a lot less colour too.

You would need to use a lot of paint to achieve a dark colour of texture paste!

Not Just Impasto Pictures

However, you can use texture paste in ‘normal’ paintings as well. I like to use it for things in the foreground and help to give more depth to the picture.

In the photos you can see where texture paste has been used in quite a subtle technique. I could have used straight paint for a similar result, but I find that using a palette knife and taking the paste from its jar–like container a lot easier. I think it gives a better result as well.

In this example I used the paste to add texture to different sections of the front edge of the stone pillar. This particular picture is painted using the acrylics in a watercolour style, but because I’m using acrylics it is possible to add this extra quality to the picture.

(This painting is “The Old Man of Hoy in the Sea Mist”. This stone stack is found in the Orkney Islands at the far north of the UK.)

Other Ideas

You could use this technique for bushes in the front of your landscape pictures. It is handy for stony foregrounds too.

Top Tip - When you paint over the dried paste add darker colours to the hollows to give added depth. A good effect for the minimum effort ;-)

This is a great technique for adding interest to your pictures.

Monday, May 28, 2007

Top Tips for using Acrylic Paints – Number 10

Use Acrylic Mediums to Extend the Range of Effects

Adding an acrylic medium to the paint allows you to create a further range of effects.

For example – the glaze medium can help to produce watercolour effects. Glaze mediums are available in both gloss and matt finishes which will give different results to the final picture. A good idea is to use a gloss medium on the highlights, especially on water, for a lovely finish.

There are also gel mediums and texture paste which will give extra body to the paint for three dimensional effects. Rather than use a lot of paint to achieve a 3D look you can add the gel medium to the paint and it will bulk it up, this is a lot cheaper than using straight paint.

When using the texture paste is easiest to apply the texture paste to the painting surface and let it dry. Then paint the colour you want on top of the dried texture paste. You can add a darker colour to the ‘valleys’ to add to the textural look too.

Monday, May 21, 2007

Using 'Light Reflecting' Paint


The How to Paint Abstracts for Pleasure and Profit report discusses how to use water-based paints to make your own unique artwork. This free report is available using the link above to the free report on painting. In the report I talk about how to use the same paints (that were used for decorating the room) in the painting so that your final picture will be a perfect match.

I’ve found that mixing different types of water-based paint works well. I usually seal the final picture with a thin coat of matt acrylic varnish or acrylic medium. This will ensure that the artwork can be wiped with a damp cloth to remove any household dust.

A New Paint

I recently discovered a Dulux paint called Light & Space. They say it “reflects up to twice as much light around the room using our unique LumiTec (tm) technology. It’s an amazing effect …”

I wondered what effect it would have in a landscape painting. Could it make the light glow and add to the impression of the reflections on the water?

What I Did

I bought a tester pot in Pacific Breeze (tm) - they seem to have trade marked all the names! I painted this (quite roughly) in the centre section of a stretched canvas. Hoping to be amazed I let it dry and then took it indoors to see the effect. ;-)

To be honest it isn’t a huge effect but there is a little more light reflected in certain low light levels. I was hoping for more but decided to carry on with the painting in any case.

Limited Palette

I like limited palette painting - that means just using a few colours and adding white and black to get the range of tones.

In this case I wanted a subdued blue. I mixed some ultramarine blue with some black in a small container. This was my main colour and I only added white and black to the main colour for this painting.

Technique

With this technique it is best to mix up a good amount of the main colour so that you don’t run out and have to remix your main colour. Trying to match the original colour can be a real nuisance.

The Result

There is a difference in the water and the cloud areas where the original Light & Space paint is still visible. In low light levels it gives off a slight glow, and I think this is what keeps you looking at the painting. It is not an obvious effect but it is something that seems to catch your eye.

Why not invest in a tester pot and try it yourself? You could use it in an abstract painting too if you wanted.

Tuesday, May 08, 2007

Top Tips for Painting with Acrylic Paints – Number 9

Using thick paint

Try applying acrylic paint thickly to get an effect similar to oil painting. Applying acrylic paints thickly will give a textural oil paint look.

Use it for foreground definition

The closer a part is to the foreground of the picture the more detail you can see. So put more detail in the sections in the foreground of your painting to help this illusion.

One way to do this is to use the paint thickly in the foreground of a picture for texture and increase the detail. The painting will look more interesting too.

Monday, April 30, 2007

Top Tips for Acrylic Painting – Number 8

Acrylic paints are very versatile. You can use them both in thin coats of colour or thickly depending on the result you want.

Water Colour Effects

Thin coats of acrylic paint can be used to give a watercolour look to a picture. The thin layers of paint will have the transparent quality of watercolours.

A point to remember when painting using transparent coats is the white acrylic paint is an opaque colour. To paint a pale colour do not add white to make it pale, instead add water to thin the colour and apply thin layers of paint.

On a white background the white of the painting surface will show through the colour making it appear paler.

Tuesday, April 24, 2007

Useful Info about Mounts or Mats used in Picture Framing

This months post looks at mounts, or mats, used in picture framing.

When you are framing a painting or print it can look better if you add a mount to the painting before having it framed. This can make a small painting look larger and more important when hung.

The mount is the paper or card border around the picture. You would use a mount on a picture that is painted on paper or one of the thinner painting surfaces. If your picture was on a stretched canvas having it mounted would not be an option.

I’ll use the term mount throughout this newsletter rather than saying mount or mat the whole time, but you will know what I mean!

Cut Your Own?

There is a local craft and artist shop opening up in the town and I will be displaying some pictures for sale there. So I need to mount them for display.

I have a mount cutter and sometimes cut my own mounts, but I find it all a bit of a chore. I bought the mount cutter about 15 years ago when it was unusual to see ready cut mounts for sale.

As I will need a few mounts I thought it would be easier to buy them ready cut. The ones that are available now are “cut on computerised mount cutters for quality and consistency”. That sounds really good. ;-)

Of course the mount needs to be on good quality heavy paper or thin card which is acid free.

Aperture

The window cut in the middle of the mount for the picture is the aperture. This is normally made with a 45 degree angle cut for a better finish. This has 2 benefits. The sloping cut gives a lovely finish, and if you are using a coloured mount this cut edge shows the centre of the mount material (normally white) and gives a white line around the picture. This is a very pleasing look.

Of course you can always add lines on the surface of the mount to highlight the edge around the picture. Sometimes people paint a border on the mount to match the colours used in the painting.

Double Mount

Another favourite is the double mount where there are two mounts and the aperture of the top mount is a bit bigger than the bottom mount.

Often the bottom mount is in a dark colour and the top one in a pale colour.
So when you look at the painting there is the picture, and then around the picture is the white of the cut edge, next the surface of the dark mount, the cut edge of the top mount (white line) and finally the top pale mount.

This style of mounting gives a double edge which highlights the painting and can really enhance the final look of the picture. I like this style of mounting a picture.

Of course this is then framed with a glass fronted frame to keep it clean.

Landscape or Portrait

Landscape or portrait refers to the layout of the picture. If it is wider (than tall) than it is in the landscape format and if the picture is taller (than wide) it is in the portrait format.

A standard framing technique says to cut the bottom side of the mount a bit wider than the other three sides. This is makes the final framing look better. It has to do with the way our eyes see things. By making the bottom section of the mount a little wider the final framed painting looks better. (I have heard this described as adding weight to the bottom.)

However, when buying ready cut mounts the aperture is placed in the centre so that the mount can be used for both landscape and portrait layouts.

This is not a major problem but one to bear in mind when deciding whether to buy a ready made frame and mount for displaying your paintings and doing it yourself, or if you want to pay and have it professionally framed.

Is this a problem?

Not really.

I think that this would be important on larger pictures where the mount would have quite a big area, and so it would be more noticeable.

The other time this would cause a problem would be if you wanted to use a very wide mount. (I am sure you have seen small paintings with mounts bigger than the picture itself.)

Otherwise I think that ready cut mounts will work fine. If your picture is A4 size or smaller using a ready cut mount should be alright.

Traditional or Abstracts

Although framing using a mount is normally seen on traditional pictures it can also enhance abstract artwork too.

Abstract art often works best with stronger colours for the mount. A black mount on a vibrant painting can be very effective.

I recently saw an abstract picture with a black mount and a metallic strip added to the mount to match the metallic paints used in the picture. Stunning.

I hope you find this useful.

Tuesday, April 17, 2007

The Black Canvas Project - Paint Something Different!

This is a good idea for the times when you want to try to paint something a bit different. The final result can be stunning.

Instead of starting with a white background why not try a black one?

Although I call this the Black Canvas Project it does not need to be a canvas! It works just the same on any painting surface, like paper or canvas panel.

What to do

This is really easy; just paint the whole of the painting surface with black acrylic paint. OK, I know this can look a bit drastic to start with but it really is an interesting option when starting a painting.

What then?

Usually you need to paint in the middle tones, shadows and then highlight the objects in your painting; however with this technique you already have all the shadows in. In this case you are picking out just the middle tones and highlights.

You may need to apply the paint a bit more thickly than normal, depending on your painting style.

This is useful when painting sunrise/sunset type pictures that have a lot of shadow. It is great for stormy pictures too.

Abstracts too

This technique works well with abstract style paintings too. It is especially effective when you want to include some metallic paints. The dark background shows up the metallic colours and makes them more vibrant.

What about adding an acrylic medium?

If you have one of the acrylic mediums that give a metallic effect to the paints you will be able to make a range of metallic colours. I have an Interferance Medium in Gold that works really well.

For a more subtle look you could try the Pearlescent Tinting Medium, which is my favourite of the moment.

When you use a medium you still get the colour but with a metallic effect. The metallic colours, like gold and silver, just look like metal. Your choice will depend on the result you want to achieve.

Next time you fancy trying to paint something a bit different look out the black paint!

Monday, March 12, 2007

Top Tips for Acrylic Painting – Number 7

Acrylic paints are water based and should not be used over oil paints.

Oil paints, or any other surface that is oily or waxy, will repel the water in the acrylic paint and the acrylic paint will not stick to the surface.

Never try to use acrylic paints on top of oil paints. Be sure to check that any painting surface you use is suitable for acrylic paints. Some painting surfaces are made for oil paints and will not be suitable for painting on with acrylics.

Monday, March 05, 2007

Top Tip for Acrylic Painting – Number 6

You can save yourself a lot of time and make painting even more enjoyable if you get into the habit of always placing your colours in the same order on your palette.

This is a simple technique and probably one of the best. When the colours are always positioned in the same area of your palette it makes setting out the paint colours a quick process.

During your painting session when you want to use a particular colour you know exactly where to find it on the palette. Otherwise you will be holding the paint brush over the palette as you search for the colour you want to use.

Painting is a calming hobby, use this tip and make your painting a pleasure.

Monday, February 26, 2007

Cadmium Yellow - Pigment Information and Meanings of the Colour Yellow

The pigment in Cadmium Yellow is based upon cadmium sulphide which produces a golden yellow pigment.

The pigment was first discovered in 1818 and is still in use today.

How it was made

Cadmium sulphide was prepared with an acid solution of cadmium salt which was heated with hydrogen sulphide gas until a powder was formed. The hues range from a lemon yellow to a deep orange.

Permanence of this pigment is excellent. The deeper varieties of cadmium yellow and orange are the most permanent.

Not for murals!

However Cadmium Yellow does discolour with combined exposure to the light, water and carbon dioxide by forming cadmium carbonate. For that reason it can not be used in mural painting techniques.

Pigment exposed to the same amount of light used on canvas or panel will not change. Therefore cadmium pigments are classified as absolutely permanent with the exception that they are not suitable for the exterior applications and for mural painting techniques.

The pigment is used in both oil and watercolours.

Some Meanings of Yellow

Although considered an optimistic colour people lose their tempers more in yellow rooms and babies cry more often, not the best colour for a nursery then. ;-)

Yellow has good visibility and is used as a colour of warning. It is also used as a symbol of quarantine or for an area marked off because of some danger.

Spanish executioner once wore yellow – they sound quite dangerous!

In Egypt and Burma yellow is a sign of mourning.

Yellow enhances concentration and speeds up your metabolism.

Yellow is the colour of peace for holistic healers.

In ancient Rome yellow was the most popular wedding colour.

A yellow ribbon is a sign of support for soldiers.

In India it is a symbol for a farmer or merchant.

In the Middle Ages actors portraying the dead in a play wore yellow.

In 10th century France the doors of traitors and criminals were painted yellow.

If someone is considered a coward it is said that they have a yellow streak.

As with the other colours we have looked at there is a range of meanings and symbolism.

Monday, February 19, 2007

Top Tips for Acrylic Paints – Number 5

The fast drying of acrylic paints can mean that a lot of paint is wasted when it dries on your palette.

The way to avoid this is to use a Reservoir Palette. You can either buy or make up a reservoir palette. (Making your own palette is described in the Acrylic Painting Course.)

A reservoir palette has a damp reservoir topped with a paper palette for mixing the paints on. The reservoir keeps the paints damp and stops them from drying out during your painting session.

At the end of your painting session you cover the reservoir palette and the paints will stay wet. That means when you want to continue your painting you can still use the paints from the previous painting session that have been kept damp on the palette.

I find that the paints will keep well for a couple of weeks however I keep my palette in a cupboard in between uses. Don’t leave it out in the sunshine!

A reservoir palette is a good economy measure. Also any colours that you’ve mixed will still be useable when you go back to continue the painting.

Monday, February 05, 2007

Top Tips for Acrylic Painting – Number 4

The Type of Brushes to Buy

Previous painting tips have mentioned that acrylic paints dry very quickly. If the paint dries on your brush it will ruin the brush and you’ll need to throw the brush away.

The way to avoid this problem is to keep your brushes wet during the painting session. This can be done by storing the brushes in a shallow container. An old ice cube container is ideal as it allows the brushes to be stored on their sides, which stops the brush tips from getting damaged or bent.

Fill the container with enough water to cover the brush tips. Rinse your brush and then store it in this container until you need to use it again.

Choose Nylon Brushes

Buy good quality nylon brushes. Good quality brushes give a better result and are less likely to shred.

Nylon brushes can be stored (on their sides) in water, but other types of brushes would be damaged by this treatment. In particular, sable brushes would not put up with this kind of treatment.

At the end of a painting session you can spend a bit of time and thoroughly clean the brushes before storing them. However I usually just leave them in the container of water until the next painting session, and that works too.

Monday, January 29, 2007

I was inspired

I recently watched a TV programme about Rolf Harris.

(I always remember him for doing large paintings; they must have been about 8 by 6 foot size, using a 6 inch paint brush. When he was painting he used to say “Can you tell what it is yet?”

When he finished the painting he would stand in front of it and sing a song. Of course the painting was the same subject as the song he sang, and provided a good backdrop for his performance.)

It was a very good programme and he talked about coming to London from Australia in the 1950s.

He went on to say that his mentor (painting mentor) showed him how to cover the whole canvas in paint and then pick out areas and refine them. The approach was to work on the whole of the painting rather than focusing on a particular section.

How about trying a different style?

Of course he was an accomplished artist already, but it can be interesting to try to paint in different styles and try various methods of applying the paint. It can be easy to get caught up with the idea that you have to paint in a certain way or have a proper picture at the end of it.

I know this happens to me! It is not always easy to allow yourself the freedom to experiment on a painting surface. However if you do not like the final result you can always cover the canvas or canvas panel with a layer of gesso or thick white paint and reused it. If you are painting on paper you can throw the paper away or cut up parts of it to use in a collage.

Trim it to a good bit!

If you are painting on paper or a canvas panel you might have a particular section that you really like. Using these painting surfaces means that you can trim down the surface leaving you with just your favourite section – another masterpiece!

Do not stress about painting something wonderful. You can learn a lot by just playing around with your paints, and having a good time too.

No time like the present

In Rolf Harris’ case he had stopped painting for about 10 years before he was offered a painting TV programme to do. So even if you have not picked up a paint brush for a while there is no excuse.

His enthusiasm was contagious; he was having a great time. He said that he likes to turn off the TV and do things instead. I have to admit on a dark winter night I tend to just sit and watch The Box.

Perhaps you will think about doing something more interesting, I know I will be!

Monday, January 22, 2007

Top Tips for Acrylic Painting – Number 3

Do NOT let the Paint Dry on the Brush

Acrylic paint dries very quickly and it is important not to let the paint dry on your brush.

If the acrylic paint does dry on the brush, the brush will be ruined. If this happens you will need to throw away the brush. This is really disappointing if it is a favourite artist’s brush, and can be expensive!

During a painting session rinse the brush and store the brush in a shallow tray of water, on its side to avoid damaging the tip. This way any residue of paint in the brush will be kept wet.

Give the brush, or brushes, a good clean at the end of the session.

Monday, January 15, 2007

Top Tips for Acrylic Painting – Number 2

Cover surfaces and yourself!

Acrylic paints are water based, and the brushes are cleaned using water. However, once the paint is dry it forms an impermeable skin.

If some of the paint dries on your hand you will see that it looks like a thin layer of plastic.

Therefore when acrylic paints are dry they can be almost impossible to remove (depending on the surface).

If you are painting be sure to cover any important surfaces that you do not want to have marked with paint.

Acrylic paint will also stick to fabric so it is a good idea to wear painting clothes too!

Monday, January 08, 2007

Top Tips for Acrylic Paints – Number 1

Always replace the top or lid of your acrylic paint.

Acrylic paints dry very quickly so always replace the top back on the tube of paint, or the lid if you are using containers of paint.

If you don’t replace the lid the acrylic paint will start to dry. Once acrylic paint is dry you cannot re-wet it. Therefore it will need to be thrown out as you will not be able to use it in your painting.

Also paint drying in the tube is annoying! The bottom of the tube could be cut off and some paint rescued that way, but it is easier to get into the habit of replacing the top every time you open up your acrylic paint.

Replace the top of the acrylic paint and it will last for a long time.