Tuesday, December 15, 2009

How to Change the Season of Your Snowy Painting


One of the benefits of painting with acrylics is that further washes of colour do not disturb any previously dried paint. Unlike watercolours where if you add additional washes of colour you can loosen any existing underpainting.

This means that it is simple to change a snow scene into another season. However it does not work well for changing other seasonal painting into a snow scene. :-)


How to do this

This is a really easy technique. Apply washes of colour over your existing snow scene (the top painting is the original one). All the shading will still be visible and the white of the snow will change to the colour of the wash you are applying, as shown in the second picture


Increase the detail in the foreground

In a snow scene a lot of the vegetation is covered with snow so the amount of grassy things you will have in the foreground is reduced. However, when you change the season of the painting you can add a lot of grasses and plants to the foreground to enhance the picture. This will also add to the feeling of depth. A few extra grasses have been added to the third picture.

This is also a good chance to introduce more colour using flowers which will add to the change of season feel of the picture too. You can add as much foreground detail as you like.

Wednesday, November 25, 2009

Another Plastic Wrap Painting Technique Especially for Collages

I have been trying another plastic wrap technique, but without too much success this time. However maybe you will have more luck than me!

I read about another use for plastic wrap. This one is done by applying acrylic paint thickly to crumpled plastic wrap and letting the paint dry.


The paint can then be peeled off in a layer. You can cut it up for use in collages and mixed media paintings. It can be ‘glued’ on using acrylic gel or medium as an adhesive.

(I thought using thin rectangles for fence posts in the foreground of a picture would work well.)

Depending on your picture you may wish to use a blend of colours.

Or

Another ideal could be to add some beads or other small items to the wet paint. Remember that you will probably want to use the rear of the paint as the good side so push the beads right down so you will be able to see them once you remove the plastic wrap.

You can use old paints or colours you do not particularly like to try out this idea.

My Attempt

My attempt was not too successful. I applied some of my old paints to the crumpled plastic wrap hoping for some wood-like texture. Once the surface of the paint was dry I tried to peel it off the plastic wrap.

It came off OK but it was only the surface of the paint that was dry. As the centre was still soft I left finger prints in the sections that were pulled off.

So I decided to leave it to dry fully. But then the plastic wrap was really stuck onto the paint and the crumpled areas were embedded into the dried paint. So no success this time either.

I think the trick is to judge the ‘dryness’ of the paint so that you can remove it from the wrap while it is firm enough not to dent from the pressure of your fingers but before it sets too much.
This may required a bit of trial and error to get it to work successfully. :-)

Maybe you will have more luck than I did with this technique. I think it would be really useful if you can get it to work!

Thursday, October 29, 2009

Eagle Painting Using the Textured Background


Here is the final picture using the textured background from the previous blog posting.

I think these backgrounds work really well with strong graphic images.

The eagle is inspired by eagle tattoo designs and is painted using a mix of Prussian blue (the same blue used in the background) and Payne's grey.

I have just listed it in my eBay store, I hope it sells :-)


Tuesday, October 20, 2009

How to Use Plastic Wrap for Texture with Acrylic Paint

Using Plastic Wrap for Texture

This idea is to seal your painting surface, apply a second coat of a different colour or tone, then place some crumpled plastic wrap on top to make a texture in the second coat of paint.


The Method

So the first thing to do is apply an undercoat colour to your painting surface. Make sure that the painting surface is sealed; apply a second coat if you need to.


Next mix a second colour with some gel retarder.

The gel retarder will slow the drying time a little, which is handy for this technique.
Try 1 part colour to 1 part retarder.

Apply thinly to the painting surface and do not let it dry. Then you scrunch up some plastic wrap (we often call it cling film in the UK). Unfold loosely so that it keeps its wrinkles.

Lightly press into the glaze and pat gently, and remove before the paint dries.

There are two important points for this stage.

  1. If you do not like the effect you can brush over it and try it again until you achieve an effect you like, at least until the paint dries!
  2. Do not press the film too firmly or you will leave finger impressions in the texture, if this happens you can refer to point one above. :-)


This technique will give a random background texture. It can sometimes look a bit like leather.


In my example I used Prussian blue and some white for the base coat, this was painted onto a canvas panel. I used a darker version of this colour for the second coat with the texture. This gave quite a delicate textured look.

However, as it was difficult to see the effect in the photo I let the second coat dry and painted a third coat using mostly white. I think you can see the texture more clearly in the photo for this one.

It's also a good example of how you can build up the texture using several coats if you want.

This is a handy way to paint in a background for a silhouette style painting, or for a graphic with a strong outline.

Monday, September 21, 2009

How to Paint a Simple Sky Video

Here is a video clip that shows how to paint a simple sky


This simple sky is an excellent starting point for a range of pictures.

There is a good rule - if you have a complicated foreground be sure to keep the sky simple. When you want to paint a 'busy' sky keep the foreground plainer for a pleasing result.

Snow Scene Using 3 Colours - 2 CD set

This video clip is the start of the video I sell showing how to paint a Snow Scene Using 3 Colours. It is an interesting project and using a limited palette is a useful technique.

If you would like to see further details on this item please go to the Learn and Do website

http://www.learnanddo.com/

and click on the Acrylic Painting Course link and then the order page. The details of the Snow Scene set are further down that page.

Why do I not just put in a link directly to this page?

If I am having any problems with the website, supplies, my holiday :-) or illness then the home page is changed to the 'this website is being updated page'. This means that if there is any reason why I cannot give you the best service, you will know when you get to the home page.

This doesn't happen very often but I want to ensure that if you trust me enough to try my products that I'll give you the good service you deserve.

Monday, June 22, 2009

The Easy Way to Paint a River


This is an easy and effective technique for painting rivers. When you are painting a river it can be a bit daunting trying to get all the details in. This method paints the river in two stages so there is less to concentrate on in each stage.

The idea is that you paint the riverbed and some of the riverbank area first and let it dry. Next you over paint the area with some washes of colour then add details to enhance the final result.

Start with the underpainting

I like to use neutral tones for the stone, rocks and gravel that make up the bottom of the river or stream. It will depend on the stones natural colour whether you'll want to choose colours to the brown or grey tones for the main colour.

In either case it usually looks best if you include some of both colours. Once you have decided on the colour of the local stone you can add more of it to your base painting if necessary.

I like to underpaint some of the river banks as well. My favourite way is to include the middle and distant areas. (This can help to unify the look.) The main detailed area will be in the foreground sections which will be done later on.

At this stage you're just painting in the stony areas in the neutral tones and concentrating on getting the shapes and modelling of the rocks looking good.


Add some colour

Once the underpainting is fully dry add washes of colour to show the water and highlights on the river.

I think it is easier to start with pale washes first and then darken in the areas along the banks.

Then paint in any bank areas using thin washes of colour. There will probably be areas in the water that will reflect the grasses, so you can add them at this stage using the same wash as the riverbank.

If you are painting a sunset then the sky colours may be reflected in the water too.


Add some thick paints for definition

After you are happy with the washes use some thicker paints to give some of the areas a bit more detail. For example you may want to add ripples to the stream. The riverbank vegetation will look more interesting if you take the time to paint in some grassy shapes.


Don't forget the Highlights

I like to add the highlights in the water at the end of this process. They can be where the sunlight is hitting the water or perhaps where the water is disturbed by the rocks underneath.

The highlights may be short strokes for a sparkly look or long smooth lines for a calm ripple effect.


This will work for...

This will work for pictures where the water flows between the rocks too. Just use the same method but leave some of the rocks ‘out of the water’. You can add extra detail to these stones if you want.


Top Acrylic Painting Tips

If you only want to see a bit of the riverbank then add some white to the wash colours. As acrylic Titanium White is an opaque colour the wash will be less transparent.

Highlight with ripples of darker colours as well as lighter ones for lovely effect.


***


This is a really effective technique that I hope you'll try. Remember you don't need to do a whole painting to test it out. You can try it on a spare piece of paper to see if you like the look of it.

This example is just a quick painting, if I was doing a proper painting I would probably add in some tall grasses to the foreground.


Thursday, May 21, 2009

How to use Fabric to Produce Colour Matching Artwork

When you’re decorating a room you will often replace the curtains, cushions and other soft furnishings. You can use some of the new fabrics to create your own colour (and pattern) matched art.


What size?

Choose your stretched canvas so that it is the size you want for the completed picture. This choice will probably depend on where you intend to display the canvas.


Then you have a couple of options...

1. You can stretch the fabric over the canvas, and staple it on at the back. Seal the fabric with a clear acrylic medium and leave to dry. You now have a completed piece for displaying.

When you’re using a medium to heavy weight fabric (cotton works best) you can fix it over just the stretchers. (In the same way as a stretched canvas, but without the canvas)

If you’re good at woodwork you could make up a wooden frame to stretch the fabric over.

2. Or once you get to this stage you can prime the fabric with a matt acrylic medium and once it is dry you can add some paint to enhance the look and make a totally original piece of art.

If you’re using a fabric with a pattern you will need to use transparent or thinned colours if you don’t want to cover up the original fabric pattern.


Use your imagination

This is an interesting way to make matching artwork when you are decorating.

You can use some of the leftover fabric and add additional colours or patterns. This way the artwork will match those colours and patterns used in the room without being exactly the same.

Top Tip Be sure to buy some extra fabric it you want to try this idea.

You could add some metallic paints to decorate the fabric, or paint some thicker paint onto certain areas to make it more three dimensional.


Fabric weights

If you wanted to do this with a thinner fabric you can glue the fabric onto a stretched canvas. However if the fabric is strong enough you can just staple it onto a stretched canvas instead. Just stretch the fabric and staple it onto the back of the frame for the best result.

To do this start in the middle of the opposing sides and work out towards the corners. I find it best to do just the middle section of the top and bottom sides, then the middle section of the left and right sides before getting all the way to the corners. It helps to get the fabric smooth and flat.

If you have trouble getting a tidy result you can always remove the staples and start again.

As I mentioned already if you’re using a strong cotton type fabric you have the option of fixing it to just the stretchers (without the canvas). However I like to use a stretched canvas as I think that having the canvas underneath the fabric makes the final piece stronger and it’s easier to paint onto as well.


You could sew

If you wanted to use a few different fabrics you could always sew them together to make up a fabric section big enough to cover your stretched canvas. And then carry on from there.

You can really use your ingenuity to produce something wonderful.


Other additions

This idea works really well with patterned fabrics. You can just pick out some of the pattern to enhance, either with additional paints or adding some of the unusual acrylic mediums. Some of these acrylic mediums have things added to them (like small beads) to produce an interesting look.

Acrylic paint also acts as an adhesive so you could add small objects to the wet paint.


The Best Top Tip

Be sure to staple the fabric onto the back of the stretched canvas so that (when the canvas is hung) the stapled area will be facing the wall. Spend a bit of time getting the corners looking neat and tidy too. This means that you can hang the artwork without a frame and it will look great.

This is a modern look and (with no need to pay for framing) it will save you some money too.

Making your own original artwork can be easier than you think.

Tuesday, April 21, 2009

Acrylic Painting Technique – Make a Print Unique (Part 2)


The top photo is the black and white photograph I cropped from the original photo.
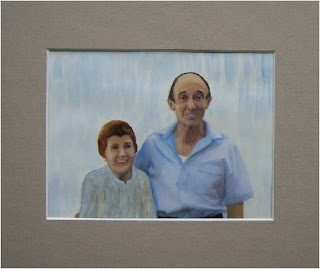
The lower image is my completed painting.


Using acrylic paints and mediums

In this second part I'm trying a mix of two painting techniques.

I'm still using the same photo of my parents that I used in last month's posting, but this time I printed it onto a thinner photographic paper. The photo paper is a matte General Use one of 120gsm, for using with inkjet printers. As before, if you want to try this you need to make sure that your printer ink is not affected by water once dry. My printer uses pigmented inks that are waterproof when dry.

This time I started with the same photo and cropped out the part I wanted to use. I didn't like the background in the photo so I cut it off. Last time I painted it out but this time I want to try to use the paint as thin washes.

I then printed out the cropped photo in black and white. I'll add the colour using the paints.

Seal the Back of the Paper – First Technique

As this is fairly thin paper I sealed the back of my (cropped) print with Acrylic Gesso. Once dry I'm hoping that it will stop the paper from buckling too much when I apply the washes. This technique is explained in the blog posting of the 20 January 2009.

I left this overnight to make sure that it was fully dry.

Use washes of colour

I used washes of colour to paint the print. This makes painting the faces a lot easier as the lines and shading are already in place. No worries about getting the faces looking good either. :-)

In this example I still wanted to change the black of my mother's top to something lighter and this had to be painted with thicker paints. However the rest of the painting was put in using thin washes of colour.

I used a light random wash for the background as the portraits are the main focus of the picture.

The Result

I didn't spend too long on this painting. The original print was very low resolution so the printed image is not too clear, which I really like. So when I added the colour I did not want to be too precise. I think that it makes the final result look more like a painting than a coloured photo.

Using the gesso on the back helped to stop the paper from stretching too much but it still buckled a little bit when wet, however on the whole it was fine.

I'm fairly pleased with the result.

***

This example used a 'budget' weight of photographic paper compared to the one in last month's example. If I hadn't put the acrylic gesso on the back of it the paper would have stretched too much to get a good result. The paint would have puddle in the lower areas and looked terrible.

I prefer the painting from last month as it looks like a 'proper' painted portrait. However this example using washes gives a very good likeness and was painted in a fraction of the time too.

It really depends on the look you want and the photo you are using.


.

Monday, March 23, 2009

Acrylic Painting Technique – Make a Print Unique Example


Example using acrylic paints and mediums


Here is an example of starting with a print and painting over the top of it. This is an easy way to paint an original picture without needing to draw! (This is an example to go with the article of the same name below.)

I don't paint a lot of portraits (human ones). I paint a lot of pet portraits and I must say I find painting fur a lot easier than skin. :-) Anyway I thought this would make a good example.

This is a photo of my parents. I don't have many photos of them together in their later years. This particular photo was taken on a holiday to Saudi Arabia. It's a fairly typical holiday ‘snap’.

There are a couple of things that are unfortunate. The top of the wall being in line with Dad’s head is the aspect that I think needs most attention. Also Mum never wore all black outfits; she wore it on this occasion due to the customs of the country they were visiting.


What I did

I printed out the photo on 190g/m² photographic paper; this is a thick quality paper. My printer uses pigmented inks that, once dry, don't run if they get wet.

Even though I made the print 9 by 7 inches (about 22 by 17 cm) I found it was quite small when painting some of the detail. So the picture needed to be done in a loosely painted style.


The Background

Titanium White is an opaque colour so I used a lot of it in the mix to paint the background and to get rid of the rear wall. I used the paints with the minimum of water so the paper wouldn’t buckle too much.


Keep a Copy of the Print for Reference

Once the background was dry I painted in my folks. I used the print to know where to paint the darker and lighter tones.

At this point I had to get a copy of the original print for reference and for fine tuning the picture. I couldn't see the original print once it was painted over as I had used the paint quite thickly.


Changing the Black

It took several layers of paint to change Mum’s outfit to a colour that she would normally wear.

Dad’s shirt was over-painted with a thin wash of colour and a little bit of shading.

I feel I got a reasonable likeness and I know that they would be happy that I made them look a little younger than the photo. ;-)

This technique can be used with any subject; it doesn't have to be a portrait. It would work really well with landscapes of local scene too.
You could also try it on any prints that you may have to make them more interesting and unique.


Acrylic Painting Technique – Make a Print Unique

Using acrylic paints and mediums

This is a different way to update a print into something more unique. It can make an ordinary print look like an expensive original painting.

You can use this technique on a store bought print or you can print out one of your own pictures or photos.

Be sure to check that the print colour is not affected by painting on top of it.
Note - Some computer inks will not be suitable for this method.


Paint on extra colour and texture

The idea is to paint onto the print. This will allow you to add extra colour, perhaps making it a better match for your décor? This will make the final picture unique to you as well, your own custom artwork.

You can use some of the various acrylic gels or texture mediums to show up the brush strokes too. Adding extra texture to the foreground will help to add depth to landscape pictures.

Depending on the result you want you could paint on some texture paste (which is white), then over-paint the dried texture paste with colour. This works best where you want a strong texture.

Or you could use one of the gel mediums to give texture without changing the colour too much; I find this most effective for medium texture effects.

You have the option of adding a different colour to any section of the print you want. You control the strength of the colour as well. If you do not like a particular area you can change it.

You could also add some metallic colours, it really is your choice!


Sunflowers?

An example of this technique could be over-painting a print of Sunflowers by Vincent Van Gogh. You could use this technique to add some distinctive brush stroke textures, in the same fashion he used in the original painting.

This can make a regular print into something much more interesting to look at.


Holiday Photos

If your computer ink is suitable you could print out a holiday photograph and add some paint and texture so that it will look like you painted a wonderful picture from your vacation!


Key Points

* Be sure that painting on the print will not dissolve the colours in the print.

* Adding texture to the foreground will make the distance look ‘further away’.

* You can use just paints to alter the colours, or just add a little texture.

* Use the gel mediums and texture paste for more exaggerated textures.

Monday, February 23, 2009

Tips on Painting Snow


Sometimes it's hard to know where to start when painting snow. Using a lot of white just will not work.

Titanium White acrylic paint is an opaque colour; this means that you can over-paint with the white to add lighter areas. This takes away a lot of the worry about painting the 'wrong area' and not being able to fix it!
**Start with the Medium Tones

When starting to paint snowy areas I like to start with a medium tone.

In my example I started with a little Ultramarine Blue and Titanium White mix. Vary the tones a bit when you paint the snow. Think about any hollows and make them a bit darker (bluer). I like to use blues in snow scenes, I think the cold look it gives is appropriate for the subject. However you can also use other colours depending on the result you're after.

In other paintings I've used a brown (Burnt Sienna) instead of blue. It works well and gives a warmer look to the finished picture.

In my example you can see that I have some warmer tones of brown in the tracks in the foreground, this helps to add depth to the painting (warmer colours to the front). I also added some purple tones for a bit of variety.

Snow will reflect other colours so if you were painting a sunset or sunrise you could add some of the sky colours to the snow. This will add a unity to the final picture and it's fun to be able to use all the colours too. And, as before, if you paint on too strong a colour you can always pale it down by over-painting with white.
**Only the Highlights are Pure White

Save the pure white for highlights. You can paint the highlights several times to cover up any existing colours and to get a bright result.

I find it best to leave the completed painting and come back to it the next day and add the highlights, and often I darken a few areas for contrast too.
Sometimes it'll take several layers of paint to achieve a pure white highlight; it's handy that acrylic paints dry so quickly. :-)

Doing this really gives the picture a lift and makes it sparkle.

Snow Scene using 3 Colours


See how to paint this lovely snow scene using just three colours of acrylic paint, available from the Learn and Do website.

Computer video files

This is a computer video file on two CDs. The first CD shows how to paint this snow scene. The second CD shows the finishing touches and has the e-book guide to painting the picture.

The guide is a .pdf file showing photographs from the video at the various stages so it is easy to follow when you paint the scene yourself.

These files are viewed using Windows Media Player – if you have one of the newer versions of Windows you probably have it already on your computer.

Using computer video files means that, unlike DVD, there are no problems with regional variations.

Get your copy

To buy your copy just visit the Learn and Do website (link at the top of this page) and go to the order page for The Acrylic Painting Course. This item is listed at the bottom of that page.

Tuesday, January 20, 2009

A Different Use for Acrylic Gesso?


I recently read an article about using acrylic gesso to prime the back of a paper painting surface. It said that you do not need to stretch the paper if you used the gesso.

I tried an experiment of this technique and it worked really well.


What is gesso? Here is a quick definition


Acrylic gesso (from Wikipedia)

“Modern acrylic "gesso" is actually a combination of calcium carbonate with an acrylic polymer medium latex, a pigment and other chemicals that ensure flexibility, and ensure long archival life. It is sold premixed for both sizing and priming a canvas for painting. While it does contain calcium carbonate (CaCO3) to increase the absorbency of the primer coat, Titanium dioxide or titanium white is often added as the whitening agent. This allows the "gesso" to remain flexible enough to use on canvas.”

Or my basic definition is – Acrylic Gesso is like a thick white paint and is applied with a brush to prime a surface before painting a picture.

***

Using Acrylic Gesso instead of Stretching Paper Surfaces


Priming surfaces with acrylic gesso

Using gesso is the normal way to prime a painting surface; it is usually used to prime a stretched canvas before starting a painting.

It can also be used to prime card and paper. Priming the front of a paper or cardboard painting surface with gesso will change the absorbency of the surface, this means that the painting surface will not behave in the same manner as an untreated surface.

Gesso is applied with a brush so there is a surface texture and this seems to hold more paint than an untreated surface does.

You can apply gesso to the back of the paper?

If you don’t want the properties of the paper surface to change you can prime the back of the painting surface. This will also keep the paper from curling while you paint.

In my test piece I had to hold the paper onto a board with masking tape while I painted on the gesso and let it dry. It did curl a little when I removed the tape as you can see in the top photo. So I found it easiest to use some more masking tape to hold the paper in place on a board while I painted the picture (on the side with no gesso) as shown in the bottom photo.

During the painting the paper only buckled slightly when wet, and dried back flat. I think that this was very successful and I will definitely try this technique again.

I found it to be a successful alternative to conventional stretching paper.

Also, I've had a container of acrylic gesso for many months and this is a good way to make full use of it too. :-)

Monday, January 05, 2009

Add Cotton Buds to your Painting Equipment

Using Cotton Buds

I was recently painting a landscape and the middle distance area was too bright. It needed to be subdued to help give the picture a sense of depth.

With acrylics it is easy to just add a wash of a grey or blue grey to achieve this. However I wanted to keep a few lighter areas as well.

You can remove paint with paper towel but paper towel was a bit big for the areas I wanted to lift out.

Get organised before you paint

So I made sure that I had a couple of cotton buds handy before I painted on the wash. Acrylic dry quickly so you do not have time to go and get the cotton buds once the wash is applied!

Using the cotton bud I could easily lift off the colour in quite small areas, and it was much more controllable too. In this particular painting the wash was over a wooded area so I lifted off the colour to highlight just a few of the trees.

Keep a few with your brushes

I think that you will find it a good idea to add a couple of cotton buds to your painting equipment.