Showing posts with label simple technique. Show all posts

Tuesday, December 15, 2009

How to Change the Season of Your Snowy Painting


One of the benefits of painting with acrylics is that further washes of colour do not disturb any previously dried paint. Unlike watercolours where if you add additional washes of colour you can loosen any existing underpainting.

This means that it is simple to change a snow scene into another season. However it does not work well for changing other seasonal painting into a snow scene. :-)


How to do this

This is a really easy technique. Apply washes of colour over your existing snow scene (the top painting is the original one). All the shading will still be visible and the white of the snow will change to the colour of the wash you are applying, as shown in the second picture


Increase the detail in the foreground

In a snow scene a lot of the vegetation is covered with snow so the amount of grassy things you will have in the foreground is reduced. However, when you change the season of the painting you can add a lot of grasses and plants to the foreground to enhance the picture. This will also add to the feeling of depth. A few extra grasses have been added to the third picture.

This is also a good chance to introduce more colour using flowers which will add to the change of season feel of the picture too. You can add as much foreground detail as you like.

Tuesday, April 21, 2009

Acrylic Painting Technique – Make a Print Unique (Part 2)


The top photo is the black and white photograph I cropped from the original photo.
The lower image is my completed painting.


Using acrylic paints and mediums

In this second part I'm trying a mix of two painting techniques.

I'm still using the same photo of my parents that I used in last month's posting, but this time I printed it onto a thinner photographic paper. The photo paper is a matte General Use one of 120gsm, for using with inkjet printers. As before, if you want to try this you need to make sure that your printer ink is not affected by water once dry. My printer uses pigmented inks that are waterproof when dry.

This time I started with the same photo and cropped out the part I wanted to use. I didn't like the background in the photo so I cut it off. Last time I painted it out but this time I want to try to use the paint as thin washes.

I then printed out the cropped photo in black and white. I'll add the colour using the paints.

Seal the Back of the Paper – First Technique

As this is fairly thin paper I sealed the back of my (cropped) print with Acrylic Gesso. Once dry I'm hoping that it will stop the paper from buckling too much when I apply the washes. This technique is explained in the blog posting of the 20 January 2009.

I left this overnight to make sure that it was fully dry.

Use washes of colour

I used washes of colour to paint the print. This makes painting the faces a lot easier as the lines and shading are already in place. No worries about getting the faces looking good either. :-)

In this example I still wanted to change the black of my mother's top to something lighter and this had to be painted with thicker paints. However the rest of the painting was put in using thin washes of colour.

I used a light random wash for the background as the portraits are the main focus of the picture.

The Result

I didn't spend too long on this painting. The original print was very low resolution so the printed image is not too clear, which I really like. So when I added the colour I did not want to be too precise. I think that it makes the final result look more like a painting than a coloured photo.

Using the gesso on the back helped to stop the paper from stretching too much but it still buckled a little bit when wet, however on the whole it was fine.

I'm fairly pleased with the result.

***

This example used a 'budget' weight of photographic paper compared to the one in last month's example. If I hadn't put the acrylic gesso on the back of it the paper would have stretched too much to get a good result. The paint would have puddle in the lower areas and looked terrible.

I prefer the painting from last month as it looks like a 'proper' painted portrait. However this example using washes gives a very good likeness and was painted in a fraction of the time too.

It really depends on the look you want and the photo you are using.


.

Tuesday, January 20, 2009

A Different Use for Acrylic Gesso?


I recently read an article about using acrylic gesso to prime the back of a paper painting surface. It said that you do not need to stretch the paper if you used the gesso.

I tried an experiment of this technique and it worked really well.


What is gesso? Here is a quick definition


Acrylic gesso (from Wikipedia)

“Modern acrylic "gesso" is actually a combination of calcium carbonate with an acrylic polymer medium latex, a pigment and other chemicals that ensure flexibility, and ensure long archival life. It is sold premixed for both sizing and priming a canvas for painting. While it does contain calcium carbonate (CaCO3) to increase the absorbency of the primer coat, Titanium dioxide or titanium white is often added as the whitening agent. This allows the "gesso" to remain flexible enough to use on canvas.”

Or my basic definition is – Acrylic Gesso is like a thick white paint and is applied with a brush to prime a surface before painting a picture.

***

Using Acrylic Gesso instead of Stretching Paper Surfaces


Priming surfaces with acrylic gesso

Using gesso is the normal way to prime a painting surface; it is usually used to prime a stretched canvas before starting a painting.

It can also be used to prime card and paper. Priming the front of a paper or cardboard painting surface with gesso will change the absorbency of the surface, this means that the painting surface will not behave in the same manner as an untreated surface.

Gesso is applied with a brush so there is a surface texture and this seems to hold more paint than an untreated surface does.

You can apply gesso to the back of the paper?

If you don’t want the properties of the paper surface to change you can prime the back of the painting surface. This will also keep the paper from curling while you paint.

In my test piece I had to hold the paper onto a board with masking tape while I painted on the gesso and let it dry. It did curl a little when I removed the tape as you can see in the top photo. So I found it easiest to use some more masking tape to hold the paper in place on a board while I painted the picture (on the side with no gesso) as shown in the bottom photo.

During the painting the paper only buckled slightly when wet, and dried back flat. I think that this was very successful and I will definitely try this technique again.

I found it to be a successful alternative to conventional stretching paper.

Also, I've had a container of acrylic gesso for many months and this is a good way to make full use of it too. :-)

Wednesday, November 19, 2008

How to use Texture Paste and a Stencil for a 3D Painting


This is an interesting an easy technique for using a stencil to make a lovely picture. It is a handy way to add a 3 dimensional look to your paintings.

In my example I used a stencil of a Celtic knot that I'd cut a few years ago. So this is a good way of using any old stencils you may have too.
Celtic knots are usually cut into stone so I wanted a fairly rough looking result. By applying the texture paste and not being too tidy I got the rugged look I wanted. It is simple to do.

Just place the stencil on the painting surface, I used a canvas panel, and use a palette knife to fill the gaps in the stencil with texture paste. You can hold the stencil in place with some masking tape if you want.

Then remove the stencil while the paste is still wet and let everything dry. Be sure to wash the stencil straight away if you want to keep it for using again.

Apply the paint

Once the paste is dry you can paint the picture in any way you want. Depending on the result you want you can apply the paint with a brush, sponge, splatter it on with an old toothbrush, or whatever will achieve the look you want.

In my example I did all the above except using a sponge!

Another use for Stencils – Just Paint

You can also use a stencil and just spray paint through it.

Place the stencil on the painting surface and spray with paint. Thin coats will work best.

Acrylic paints dry quickly so you can build up to a stronger colour by using several thin coats, letting each coat dry before adding the next.

This is a very convenient technique for complicated shapes too.
*****
Stuck for Christmas Present Ideas?

Some people are difficult to buy for but I sell a few items from the Learn and Do website that would be great gift ideas. As a special service to you if you order any of the items below I will gift wrap it and post it with your message to whoever you specify (this will save you needing to send it your self). Most of these items include worldwide delivery, please remember the shipping time and do not leave it too late.

What about...

1. The Learn to Crochet CD has two computer video files as well as four books of crochet patterns and information. The video files are viewed on a computer and so anyone in the world, with a computer, can see and learn how to crochet. This is a wonderful gift

2. The Learn-to-Crochet DVD and Manual shows how to crochet and comes with a 47 page printed manual full of crochet information and patterns. However, this item is only for the United Kingdom due to the DVD PAL format, but it is ideal for anyone who does not have a computer.

3. The Acrylic Painting Course on CD and Acrylic Painting, the First Steps Video CD. This is a two CD set, one with the four part painting course and bonus reports. The second CD has a computer video file that shows the painting equipment, how to load brushes and set up your painting area as well as how to paint two kinds of trees. Perfect for beginners

If you would like any of these items posted to your family or friends please e-mail me when you buy them with the delivery address and the message you would like to include.


Wednesday, September 24, 2008

Painting Tips for Painting Effective Forest Areas

Here's a couple of handy tips for painting forest and woodland areas. Like so many tips once you think about it, and consider the reasoning, it is obvious. I always find that when I understand the reasoning behind a tip or technique it is a lot easier to remember it too.


Forest Lighting

When painting a woodland or forest area the darker shades are towards the centre of the wooded area. Therefore the lighter shades are on the outside trees, which are away from the centre of the forest. This is the obvious part!

When painting a forest scene if you just concentrate on the main source of light (probably the sun) you will usually have a lot of shadow areas all to the same side of the trees. However once you remember that the trees to the outside are lighter it will remind you to paint any trees further into the wooded area in darker tones. It will be murky in there.


Scrape out the Tree Trunks

Once you've painted in the trees, and the paint is still wet, you can scrape off some of the paint to indicate tree trunks or branches. A cocktail stick can be handy and a good size for this.

It usually is more effective if you only scrape a few trunks or branches. Too many trunks can add too much detail into an area in the distance. Remember there is less detail as you get further into the distance, when things are farther away you cannot see so much detail. So just doing a few scraped trunks and branches will be more effective.

Scraping away the paint will leave a light area; this is particularly good for silver birch tree trunks. You can always paint in some lighter trunks later if you want to as well.


I have heard…

I read that one artist uses a pencil sharpener to sharpen the end of his paint brushes. He uses this sharp end to scrape out the trunk shapes. I can see that it could be convenient but I think I'd end up poking myself in the face. (Ouch!)


Tree Shadows

If you have shadows from the trees that fall onto grassy areas at the edge of the woodland be sure to paint the shadows to show the angles of the ground.

If the land is sloping away from the tree then paint the tree shadow on an angle to show how the ground is dropping away. This is a great way to add interest to your picture as well.

Thursday, May 22, 2008

Acrylic Painting Technique - Use a Credit Card

A new way to use your credit card – when you’re painting

Do you remember in the Karate Kid movie the part about Polish On and Polish Off to build up his muscles? Well this technique it a Paint On and Paint Off one.

Trying different painting methods to achieve a good effect is one of the most interesting aspects of painting. So here is another one for you to try.

Paint on

Remember you don't always need to apply paint with an artists brush. There are other options like using a palette knife or even your fingers.

An alternative method for highlights

Try this on a test piece first. You simply apply the paint thickly and then remove some of the paint for the highlighted area. One of the best things to use to remove the paint is a credit card. This is quite a common watercolour technique but it works just as well with acrylics.

Paint Off Example

You can paint some stones in a fairly flat way, they don't need to look particularly three dimensional, and then use a credit card to scrape off the paint for the lighter or highlight area. Some of the paint will be left on the painting surface giving a paler section.

I think that the final result works very well, especially for rocks. It can also be very effective for the texture on tree trunks.

As acrylics dry quickly you need to be speedy! If you want to have a bit more time to work the paint you can add some gel retarder to the paint to slow down the drying time.

I've seen the scraping off of the paint done using a razor blade too, but that's a bit too sharp for me! You could try using a palette knife instead of the credit card; it will give a slightly different result.

Painting surfaces

This technique is most effective when you're painting on a paper surface, particularly a rough textured one.

However you can practice it on any painting surface you're using to see what effect it will give you. Then you can decide if you want to include the effect in your picture.

I found that it was disappointing when used on a stretched canvas unless the paint is applied really thickly.

However on a suitable painting surface it can be very effective and is another technique to add to your painting arsenal.

Monday, April 21, 2008

The Easy Way to Mask off an Area in a Painting


There are often sections of a painting that will need a hard edge. Although you can paint up to the edge, keeping a definite line can be difficult.

It is usually a better idea to mask off an area, paint the section that borders it, remove the mask and complete the painting.

Masking Options

When masking an area you have a few choices.


Masking Fluid

You can use masking fluid which is like a liquid plastic and is painted on.

Top Tip use an old brush to apply masking fluid as it can be difficult to clean completely from the brush.

Let the masking fluid dry then paint the surrounding area. Once the paint is completely dry remove the masking fluid. Do not leave it on overnight or it can be hard to get off without damaging the painting surface.

Masking fluid is handy for curved and irregular shapes.
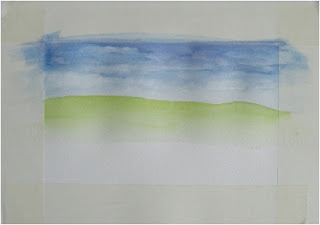

Masking Tape

I like to use masking tape. It is especially good for horizon lines in seascapes. The best part about masking tape is that you can remove it once you are confident that the paint is dry enough not to run.

However if you are painting on a paper surface it can sometimes pull the painting surface if you are not very careful when you remove it. Be careful when removing it.

I find it works very well on canvas and canvas panels. In this sketch I used it around the edges to give the finished painting a clear border.


Card Mask

Another method, and probably the easiest one when you are using a paper painting surface, is to use a piece of card. I usually end up using a piece of card from the breakfast cereal packet!

This method works best when you are using a dry brush technique, you do not want the paint too thin or it will flow beneath the card mask.

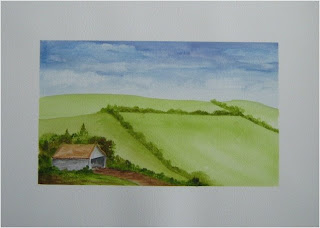
You could use it for painting in hedges in between fields in a landscape. This makes painting in hedgerows really quick. Just place the card, paint in the hedges, remove the card and paint in the field. Paint in the field while the hedge is still damp and you can blend the bottom of the hedge with the field colour for a lovely effect.

Another good example is using it to mask off the roof when you are painting shrubs and trees behind the roof line of a building. (This is shown in the illustrations).

All you need to do is cut a piece of card and hold it to mask off the roof while you use quite a dry paint to indicate the trees to the rear of the building.

Tip I find that that a card mask works best for short distances, using a large piece of card can be a bit awkward. I prefer to use a shorter piece of card and move it along as I paint.

Both of these examples use a straight edge on the card; however you could also cut the card into any shape you want for different uses. The key is not to use too wet a paint which would bleed behind the card and ruin the effect.


Which is best?

Your final choice will probably depend on the painting surface you are using.


A Word of Warning

Remember that acrylic paints are adhesives once dried. If you use a mask with very thick paint it may be stuck into the painting. Perhaps not the look you were trying for!

This is most likely to happen with masking fluid because it is removed once the paint is dried.

However, masks are very useful when using the paints more thinly and especially when using watercolour techniques.


In this quick sketch I used masking tape around the picture.

I used a card mask (second picture) for the hedges in the fields and for the building to keep the paper where the building will be clean. This is very handy when using the paint in thin washes of colour.

Wednesday, March 19, 2008

How to Draw a basic Daffodil


I saw this really easy way to draw daffodils and wanted to share it with you.

Steps

1. Draw a circle the size you want the flower to be

2. Draw a triangle in the circle

3. Draw a second triangle as shown

4. Draw a circle in the centre

5. Draw around the points of the triangles to give the petals. Use an uneven line to draw around the circle and add a second ring for the outside edge of the trumpet.

6. Depending on the size of the daffodil you may want to add stamens. You would not see these if the daffodil was further away.

If you want to draw a daffodil that is not ‘straight on’ here’s how to do it.


Draw a Daffodil on the angle


Steps

1a. Start with an oval instead of a circle. Draw in the 2 triangles as before. Draw an oval instead of a circle in the centre.

2a. Use the top and bottom of the small centre oval and draw short straight lines to form the trumpet. The end of the trumpet is a slightly larger oval.

3a. Draw around the points of the triangles to give the petals. Use an uneven line to draw around the ‘trumpet end oval’ and add a larger second ring for the outside edge of the trumpet.

4a. Again adding stamens will depend on how far away the flower is.


Important Points and Tips

These steps are for a basic daffodil shape. Notice that all the petals of one of the triangles are to the front of all the petals on the other triangle. In other words every second petal is to the front and drawn to the base of the trumpet part.

Daffodils come in a wide variety.
Things you can change for different looks are –

* The shape of the petals

* The width of the petals

* The diameter of the trumpet

* The length of the trumpet

* The colour of the flowers. Daffodils can be white, shades of yellow, orange and combinations of these colours. Have a look at some gardening books or catalogues for ideas.

In my garden

I have some small yellow alpine daffodils open in the garden just now; they have very narrow petals with a round end. There is hardly any overlap of the petals. The trumpet is narrow but quite long.

On the other hand I have some taller daffodils that have short wide petals and a very short wide trumpet. There is a great variety in both shape and size. This makes them easier to draw.

If you wanted to add leaves to your drawing just add some straight narrow leaves with rounded ends.

Top Tip

For a more natural look - angle the flower so that it is ‘looking’ to the ground slightly. The weight of the trumpet usually causes a lot of the flowers to be on this angle.

Try drawing a bunch of daffodils and see how easy this is to do.